The UIAutomation Framework
How does it run?
UIAutomation was introduced in iOS 4.0 and relies on multi-tasking support in the OS. Rather than alter your app executable UIAutomation runs as an external process – sending UI events to your application as it executes.
What does it run?
The UIAutomation framework uses test scripts written in JavaScript. Each test script is composed of a series of calls to trigger events and assertions to verify behaviour e.g. a test could be written to verify that a UIAlert is displayed when a user’s account credentials are entered incorrectly.
How does it interact with on-screen elements?
UIAutomation exposes a number of helper objects and functions to test scripts that enable interaction with on-screen elements. Using these functions we can reference on-screen elements and simulate interactions with them – i.e. tapping buttons or table view cells.
Referencing of on-screen elements is made possible by the UI Accessibility programming interface, an API traditionally used to help visually impaired users access applications using VoiceOver. By adding accessibility information to your app’s interface elements VoiceOver can read the contents of the screen. Accessibility information can be added to an element both programmatically and via Interface Builder.
Adding Accessibility Information Programmatically
To make a UIElement accessible programmatically you will need to call setAccessibilityLabel: on the UI element e.g.
[aButtonObject setAccessibilityLabel:@"Purchase song"];
Additionally if you have written a custom control/view subclass you will need to enable accessibility using:
[myCustomView setAccessibilityEnabled:YES];
Adding Accessibility Information via Interface Builder
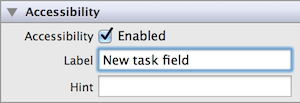
With the element selected in Interface Builder open the ‘Identity Inspector’ in the right hand pane. Under the ‘Accessibility’ section enable the ‘Accessibility’ checkbox and set the ‘Label’ field value (see below):
An Important Note!
Whilst we are discussing accessibility in the context of enabling automated testing it is important to remember VoiceOver users will rely on these labels to use your app. You should therefore ensure that all elements are appropriately labelled. The most comprehensive reference for appropriately providing accessibility information is Apple’s Accessibility Programming Guide for iOS (requires an Apple iOS Developer Program Membership to view).
Accessibility Element Hierarchy
UIAutomation’s JavaScript API includes a number of core classes including UIAElement, which represents an on-screen UI element. Within our UIAutomation test scripts we can think of the app as a hierarchy or tree of _UIAElement_s, where each element is either a parent or leaf. Consider the following simple app:
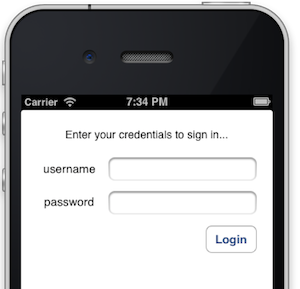
This app is composed of a single view with a number of labels, text fields and buttons forming the following accessibility hierarchy:
+- UIATarget: name:iPhone Simulator rect:\{\{0, 0\\}, \{320, 480\}\}
|  +- UIAApplication: name:Sample rect:\{\{0, 20\}, \{320, 460\}\}
|  |  +- UIAWindow: rect:\{\{0, 0\}, \{320, 480\}\}
|  |  |  +- UIAStaticText: name:Enter your credentials to sign in... value:Enter your credentials to sign in... rect:\{\{20, 40\}, \{280, 21\}\}
|  |  |  +- UIAStaticText: name:username value:username rect:\{\{20, 84\}, \{83, 21\}\}
|  |  |  +- UIATextField: value: rect:\{\{111, 80\}, \{189, 30\}\}
|  |  |  +- UIAStaticText: name:password value:password rect:\{\{20, 126\}, \{83, 21\}\}
|  |  |  +- UIATextField: value: rect:\{\{111, 123\}, \{189, 30\}\}
|  |  |  +- UIAButton: name:Login rect:\{\{235, 167\}, \{65, 36\}\}
Looking at the hierarchy we can observe a number of things:
- A UIATarget occurs as the root of hierarchy and represents the host device running the application.
- The UIATarget has a single child element of type UIApplication which provides access to application level UI elements i.e. the main window, status bar, tab bar etc.
- Below the UIAWindow is a tree of UIAElement objects representing the on-screen UI elements belonging to the app’s single view.
- Whilst UIAElement is the root type of all items referenced via UIAutomation, each UIKit class has an associated UIAElement subclass i.e. UILabels are represented by instances of UIAStaticText. This ensures that behaviours specific to each control type can be accessed via UIAutomation i.e. a UIAButton can be tapped.
Accessing UI Elements
We can use our new found knowledge of the accessibility element hierarchy to start writing UIAutomation tests. The first task of any test is to navigate the element hierarchy and obtain a reference to some on-screen element.
Start by obtaining a reference to main application window:
var appWindow = UIATarget.localTarget().frontMostApp().mainWindow();
Here we obtain a reference to the device under test, obtain the current app and get a reference to its main window (iOS apps will have only one).
Now we can obtain a reference to an on-screen element. Referring once again to the sample app above we can obtain a reference to the ‘username’ UITextField using:
UIATarget.localTarget().frontMostApp().mainWindow().textFields()[0];
Which can be read as – obtain the reference to the main application window, get the array of text field elements it contains and select the first. Whilst this works we should not rely on the ordering of the UI elements, instead we should utilise its accessibility label:
UIATarget.localTarget().frontMostApp().mainWindow().textFields()["Username"];
Now instead of referncing the username text field based on its on-screen position we are using its accessibility label. This not only removes the dependency on the ordering of the elements but also drastically improves the readability and maintainability of the test.
One last thing to note about the username example above is the call to textFields() on the app’s main window. This method is one of the numerous selectors exposed by UIAElement (and its subclasses i.e. the UIAWindow returned by mainWindow()). These selector methods provide the mechanism for you to reference direct child elements of a UIAElement by type. So for each UI element type UIAElement will expose a selector method i.e. buttons(), tableViews(), textViews(), searchBars() and label().
Interacting with UI Elements
Once we have a reference to an on-screen UI element we can simulate user interaction by invoking methods upon it e.g. we can set the value of the username UITextField using:
var usernameField = UIATarget.localTarget().frontMostApp().mainWindow().textFields()["username"].setValue('admin');
This example uses UIATextField’s setValue() method to set the text value of the field. This is just one of the methods exposed to simulate user interaction – many of which are inherited from UIAElement. Other such methods include:
- doubleTap
- dragInsideWithOptions
- flickInsideWithOptions
- rotateWithOptions
- scrollToVisible
- tap
- tapWithOptions
- touchAndHold
- twoFingerTap
As well as the methods exposed by UIAElement, each custom type will expose its own methods that describe appropriate interactions for the type of UI element being referenced. Take for example a UISlider, we could model interactions using the dragInsideWithOptions method but it makes more sense to use UIASlider’s dragToValue method. It is therefore important to refer to the class documentation for the UIAElement subclass to determine the ways in which you can interact with a particular element.
The Demo Project
We have so far covered the basic concepts required to write functional tests using UIAutomation. What we’re now going to do is to build on those concepts by writing tests for a ‘real’ application. In doing so we will see how to execute UIAutomation tests, gain exposure to some more advanced techniques for interacting with your application and learn to structure our tests.
The MyTasks Sample App
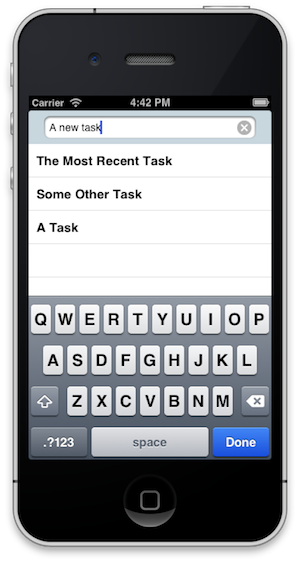
The application that we will use for this exercise is a simple task list. If you refer to the image to the left you will see that there isn’t a lot going on, we have a single UITAbleView with a single row per task. The user can add tasks by entering the title in the UITextField in the table header view, and can subsequently delete them using the swipe-to-delete mechanism.
Getting the Sample App
At this point you should obtain a copy of the MyTasks sample project source code from Github, the repository can be found here.
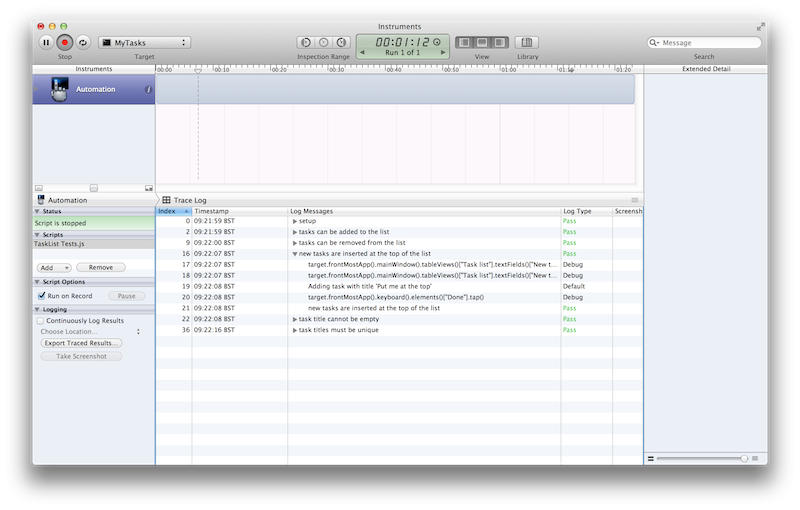
Running the Sample Tests
- Open the MyTasks sample project in XCode
- Run the app with profiling enabled by selecting Product –> Profile from the menu bar
- In the new Instruments window pick the Automation tool
- Load the test script by selecting Add –> Import… from the left hand pane (Scripts section). In the new finder window navigate to the project directory, open the Functional Tests folder and select the TaskList Tests.js script.
- Switch the active pane from Trace Log to Script and hit the play button to begin execution of the tests.
Once you begin executing the tests the active pane will immediately switch back to the ‘Trace Log’ where you will begin to see live output. As each test completes the test result will be displayed on a new line – where the ‘Log Type’ column will contain the outcome. To get more information about a particular test you can expand the test log (see below).
Writing the Tests
1. Test that new tasks can be added
Our first test is straightforward, we want to ensure that users can add a new task to the list. Breaking this down into UI interactions we can say that we would like the user to be able to tap on the new task title field, enter some text, tap the done key and have a new task appear in the list.
In order to see how we would implement such a test refer to the TaskList test suite in the MyTasks project where you will find the following test definition:§G
test("tasks can be added to the list", function (target, app) {
    addTaskWithTitle(TEST_TASK_TITLE);
    assertNotNull(taskCellWithTitle(TEST_TASK_TITLE));
}
The first line of the test is a function call to the test method provided by tuneup.js. For the purposes of the MyTasks app tuneup has been included to improve the structure of the UIAutomation tests – in particular the ability to split test suites into individual method calls to the test function. Referring back to the test implementation we can see that the test call takes two parameters, the first is a string which identifies the test and the second is a function which wraps the test logic. The function includes two parameters, the UIATarget and the UIAApplication which are injected by tuneup to provide the test logic access to the accessibility hierarchy. For now we wont discuss tuneup in any great detail, suffice to say it dramatically eases the development of UIAutomation test scripts and you should refer to the project documentation after reading this tutorial.
The second line of the test invokes another function, addTaskWithTitle, a helper method which simulates the user interactions required to add a task to the list:
function addTaskWithTitle(title) {
    var newTaskField = taskTable().textFields()["New task title"];
    newTaskField.tap();
    newTaskField.setValue(title);
    // APP is a global variable which references the 'app' parameter passed to the tests by tuneup.
// By storing the reference in a global variable we remove the need for each test to pass the 'app' parameter to this method.
    APP.keyboard().elements()['Done'].tap();
}
- The addTaskWithTitle method takes a single parameter, the title of the task to be added to the list.
- The first line navigates the accessibility hierarchy to find the UITextField with the accessibility label ‘New Task Title’ (the field contained in the header of the UITableView containing the tasks).
- The text field is then tapped to active the device keyboard.
- The field’s value is set to the title of the task being added.
- The keyboard’s ‘Done’ button is tapped – this dismisses the keyboard and triggers the task to be added to the list.
Referring back to our test the last line asserts that the task was added to the list using the statement:
assertNotNull(taskCellWithTitle(TEST_TASK_TITLE));
The assertNotNull assertion method is one of a number of useful assertion methods included in tuneup which build upon UIAutomation’s UIALogger’s logPass and logFail methods. Whilst logPass and logFail are adequate, the tuneup assertions build useful abstractions atop of them, for a full list of the available consult the tuneup documentation.
In this test we are asserting that the value returned by taskCellWithTitle is not null. Like addTaskWithTitle this is a helper method which allows re-use of behaviour common to numerous tests within the suite.
function taskCellWithTitle(title) {
    return taskTable().cells().withName(title)[0];
}
As you can see there’s not much going on here…
- A reference to the UITableView containing the tasks is obtained using the taskTable helper method.
- The array of the table view cells are obtained using UIATableView’s cells method.
- The array is searched for a cell with a name matching the task title (here the name of the cell will match its title).
Referring back to the last statement of the test we assert that the return value of the call to taskCellWithTitle is not null – in other words we assert that a cell with the title matching that of the task exists.
2. Test that existing tasks can be removed
In our first test we verified that tasks could be added to the list, the next logical step is to test that they can be removed. To test this behaviour we need to firstly ensure that a task exists – to make things simple we will use the task that has just been added in the previous test. We then need to simulate the user interactions required to delete the task, in the MyTasks app we use the swipe-to-delete gesture to do so.
Referring to the TaskList test suite the test has been implemented as follows:
test("tasks can be removed from the list", function (target, app) {
    deleteTaskWithTitle(TEST_TASK_TITLE);
    assertNull(taskCellWithTitle(TEST_TASK_TITLE));
});
Again the actual test is deliberately short, where possible we favour the use of re-usable helper methods with descriptive names. The first line invokes one such method deleteTaskWithTitle, whose implementation is as follows:
function deleteTaskWithTitle(title) {
    var cell = taskCellWithTitle(title);
    cell.dragInsideWithOptions({startOffset: {x: 0.1, y: 0.1}, endOffset: {x: 0.6, y: 0.1}, duration: 0.25});
    cell.buttons().withPredicate("name contains 'Confirm Deletion'")[0].tap();
}
- A reference to the cell with the title matching the parameter is obtained.
- A left-to-right swipe gesture within the cell bounds is simulated using UIATableViewCell’s dragInsideWithOptions method (note that the co-ords are in the range 0.0 – 1.0)
- The cell’s ‘Delete’ button is obtained using the withPredicate method inherited from UIAElement. Here our predicate matches elements whose name contains the string ‘Confirm Deletion’ – which is the default accessibility label for table view cell delete buttons (for more information on predicates refer to Apple’s Predicate Programming Guide).
- The cell’s ‘Delete’ button is tapped and the task is removed.
Referring back to the test the last line performs an assertion using tuneup’s assertNull method. This is effectively the reverse of the check that we performed in our first test. This time we want to assert that no UITableViewCell exists with a name matching the task title – hence we assert that the taskCellWithIdentifier helper method returns null.
3. Test that tasks are added to the top of the list
The MyTasks app should maintain an ordering to the tasks in its list – where the most recent last appears at the top and the oldest at the bottom. In order to test this behaviour we could assert that when a task is added to the list it becomes the first item in the table. Referring to the TaskList test suite we can find the following implementation of such a test:
test("new tasks are inserted at the top of the list", function(target, app){
    var taskTitle = 'Put me at the top';
    addTaskWithTitle(taskTitle);
    assertEquals(taskTable().cells()[0].name(), taskTitle);
});
By now you should be seeing a pattern, our tests are deliberately short and rely on helper methods to perform much of the simulated interactions. Here we again use the addTaskWithTile helper method to add a new task to the list. We then use tuneup’s assertEquals method to verify that the first UITableViewCell in the task table has a title which matches the newly added task.
4. Test that task titles cannot be empty
The final test that we will write is more lengthy as it involves some complex UI interactions. In this test we want to verify that a user cannot add a task with an empty title. In terms of UI interactions we want to assert that when the user leaves the task title field blank that a UIAlert is displayed and no new task (with an empty title) is added to the table.
Again referring to the MyTasks sample project we can an implementation of this test:
test("task title cannot be empty", function(target, app) {
    var didShowAlert = false;
    // Add an alert handler that will set a boolean flag if an error alert is displayed
    UIATarget.onAlert = function onAlert(alert) {
        if (alert.name() == 'Task Title Cannot be Blank') {
            alert.buttons()["OK"].tap();
        didShowAlert = true;
        }
        return false;
    }
    addTaskWithTitle('');
    // Give the UI thread some time to display the alert
    target.delay(2);
    // Assert that the error alert was displayed and that the task was not added to the list
    assertTrue(didShowAlert);
    assertNull(taskCellWithTitle(''));
});
This test looks a lot more complex than anything we’ve encountered so far so we’ll break it down line by line:
- A local variable didShowAlert is initialised
- UIATarget’s alert handler is set. This function is invoked when a UIAlert is presented on screen – i.e. it wont be invokved immediately, it is a callback function.
- Within the alert handler function we execute the following steps:
- Ensure that the alert is the one we are interested in by checking its title
- Dismiss the alert (to allow further simulated user interactions)
- Set the local variable didShowAlert to true – this way we can assert later in the test that the alert did indeed appear
- Next we attempt to trigger the alert by adding a task with a blank title using the addTaskWithTitle helper method.
- If everything goes to plan an alert will be displayed on screen, our alert handler function will be invoked and the didShowAlert flag will be set to true. This wont all happen immediately however so we give the simulator a short delay of 2 seconds using UIATarget’s delay method.
- We then use tuneup’s assertTrue method to verify that the alert handler was invoked.
- Then lastly we use the assertNull method in combination with the taskCellWithTitle helper to ensure that a task with an empty title was not added to the list.
Further Reading